Table of Contents
Prev Tutorial: Basic Drawing
Next Tutorial: Smoothing Images
| Original author | Ana Huamán |
| Compatibility | OpenCV >= 3.0 |
Goals
In this tutorial you will learn how to:
- Use the Random Number generator class (cv::RNG ) and how to get a random number from a uniform distribution.
- Display text on an OpenCV window by using the function cv::putText
Code
- In the previous tutorial (Basic Drawing) we drew diverse geometric figures, giving as input parameters such as coordinates (in the form of cv::Point), color, thickness, etc. You might have noticed that we gave specific values for these arguments.
- In this tutorial, we intend to use random values for the drawing parameters. Also, we intend to populate our image with a big number of geometric figures. Since we will be initializing them in a random fashion, this process will be automatic and made by using loops .
- This code is in your OpenCV sample folder. Otherwise you can grab it from here
Explanation
- Let's start by checking out the main function. We observe that first thing we do is creating a Random Number Generator object (RNG): RNG implements a random number generator. In this example, rng is a RNG element initialized with the value 0xFFFFFFFFRNG rng( 0xFFFFFFFF );
- Then we create a matrix initialized to zeros (which means that it will appear as black), specifying its height, width and its type:
- Then we proceed to draw crazy stuff. After taking a look at the code, you can see that it is mainly divided in 8 sections, defined as functions: All of these functions follow the same pattern, so we will analyze only a couple of them, since the same explanation applies for all.c = Drawing_Random_Lines(image, window_name, rng);if( c != 0 ) return 0;c = Drawing_Random_Rectangles(image, window_name, rng);if( c != 0 ) return 0;c = Drawing_Random_Ellipses( image, window_name, rng );if( c != 0 ) return 0;c = Drawing_Random_Polylines( image, window_name, rng );if( c != 0 ) return 0;c = Drawing_Random_Filled_Polygons( image, window_name, rng );if( c != 0 ) return 0;c = Drawing_Random_Circles( image, window_name, rng );if( c != 0 ) return 0;c = Displaying_Random_Text( image, window_name, rng );if( c != 0 ) return 0;c = Displaying_Big_End( image, window_name, rng );
- Checking out the function Drawing_Random_Lines: We can observe the following:int Drawing_Random_Lines( Mat image, char* window_name, RNG rng ){int lineType = 8;Point pt1, pt2;for( int i = 0; i < NUMBER; i++ ){pt1.x = rng.uniform( x_1, x_2 );pt1.y = rng.uniform( y_1, y_2 );pt2.x = rng.uniform( x_1, x_2 );pt2.y = rng.uniform( y_1, y_2 );line( image, pt1, pt2, randomColor(rng), rng.uniform(1, 10), 8 );imshow( window_name, image );if( waitKey( DELAY ) >= 0 ){ return -1; }}return 0;}
- The for loop will repeat NUMBER times. Since the function cv::line is inside this loop, that means that NUMBER lines will be generated.
- The line extremes are given by pt1 and pt2. For pt1 we can see that: pt1.x = rng.uniform( x_1, x_2 );pt1.y = rng.uniform( y_1, y_2 );
- We know that rng is a Random number generator object. In the code above we are calling rng.uniform(a,b). This generates a randomly uniformed distribution between the values a and b (inclusive in a, exclusive in b).
- From the explanation above, we deduce that the extremes pt1 and pt2 will be random values, so the lines positions will be quite impredictable, giving a nice visual effect (check out the Result section below).
- As another observation, we notice that in the cv::line arguments, for the color input we enter: Let's check the function implementation:randomColor(rng)As we can see, the return value is an Scalar with 3 randomly initialized values, which are used as the R, G and B parameters for the line color. Hence, the color of the lines will be random too!static Scalar randomColor( RNG& rng ){int icolor = (unsigned) rng;return Scalar( icolor&255, (icolor>>8)&255, (icolor>>16)&255 );}
- The explanation above applies for the other functions generating circles, ellipses, polygons, etc. The parameters such as center and vertices are also generated randomly.
- Before finishing, we also should take a look at the functions Display_Random_Text and Displaying_Big_End, since they both have a few interesting features:
Display_Random_Text:
int Displaying_Random_Text( Mat image, char* window_name, RNG rng ){int lineType = 8;for ( int i = 1; i < NUMBER; i++ ){Point org;org.x = rng.uniform(x_1, x_2);org.y = rng.uniform(y_1, y_2);putText( image, "Testing text rendering", org, rng.uniform(0,8),rng.uniform(0,100)*0.05+0.1, randomColor(rng), rng.uniform(1, 10), lineType);imshow( window_name, image );if( waitKey(DELAY) >= 0 ){ return -1; }}return 0;}Everything looks familiar but the expression:
putText( image, "Testing text rendering", org, rng.uniform(0,8),rng.uniform(0,100)*0.05+0.1, randomColor(rng), rng.uniform(1, 10), lineType);So, what does the function cv::putText do? In our example:
- Draws the text **"Testing text rendering"** in image
- The bottom-left corner of the text will be located in the Point org
- The font type is a random integer value in the range: \([0, 8>\).
- The scale of the font is denoted by the expression rng.uniform(0, 100)x0.05 + 0.1 (meaning its range is: \([0.1, 5.1>\))
- The text color is random (denoted by randomColor(rng))
- The text thickness ranges between 1 and 10, as specified by rng.uniform(1,10)
As a result, we will get (analagously to the other drawing functions) NUMBER texts over our image, in random locations.
Displaying_Big_End
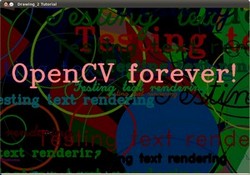
int Displaying_Big_End( Mat image, char* window_name, RNG rng ){Size textsize = getTextSize("OpenCV forever!", FONT_HERSHEY_COMPLEX, 3, 5, 0);Point org((window_width - textsize.width)/2, (window_height - textsize.height)/2);int lineType = 8;Mat image2;for( int i = 0; i < 255; i += 2 ){image2 = image - Scalar::all(i);putText( image2, "OpenCV forever!", org, FONT_HERSHEY_COMPLEX, 3,Scalar(i, i, 255), 5, lineType );imshow( window_name, image2 );if( waitKey(DELAY) >= 0 ){ return -1; }}return 0;}Besides the function getTextSize (which gets the size of the argument text), the new operation we can observe is inside the foor loop:
image2 = image - Scalar::all(i)So, image2 is the subtraction of image and Scalar::all(i). In fact, what happens here is that every pixel of image2 will be the result of subtracting every pixel of image minus the value of i (remember that for each pixel we are considering three values such as R, G and B, so each of them will be affected)
Also remember that the subtraction operation always performs internally a saturate operation, which means that the result obtained will always be inside the allowed range (no negative and between 0 and 255 for our example).
Result
As you just saw in the Code section, the program will sequentially execute diverse drawing functions, which will produce:
- First a random set of NUMBER lines will appear on screen such as it can be seen in this screenshot:

- Then, a new set of figures, these time rectangles will follow.
- Now some ellipses will appear, each of them with random position, size, thickness and arc length:

- Now, polylines with 03 segments will appear on screen, again in random configurations.

- Filled polygons (in this example triangles) will follow.
- The last geometric figure to appear: circles!

- Near the end, the text *"Testing Text Rendering"* will appear in a variety of fonts, sizes, colors and positions.
- And the big end (which by the way expresses a big truth too):